Friday, October 28, 2022

Citrix CVAD Delivery Controller Show the SQL Database Server

 Use PowerShell CLI to show Citrix Broker database server name. 


PS C:\> Add-PSSnapin Citrix*

PS C:\> Get-ConfigDBConnection

Your output will show the database server name. If it's a cluster SQL server environement, you will see the cluster name. 


 An additional powershell command to display all commands related to the DB connection is 

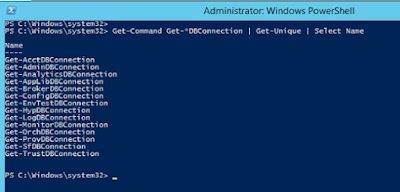
 PS C:\> Get-Command Get-*DBConnection | Get-Unique | Select Nam

The result of the command is a list of useful CLI powershell commands:

Name

----

Get-AcctDBConnection
Get-AdminDBConnection
Get-AnalyticsDBConnection
Get-AppLibDBConnection
Get-BrokerDBConnection
Get-ConfigDBConnection
Get-EnvTestDBConnection
Get-HypDBConnection
Get-LogDBConnection
Get-MonitorDBConnection
Get-OrchDBConnection
Get-ProvDBConnection
Get-SfDBConnection
Get-TrustDBConnection


Monday, October 24, 2022

Turn off Location Services -Windows 10 how To

Turn on or Turn off Location Services


Use the registry Turn on or Turn off Location Services

You may want to turn off location services ion your desktop for whatever reason. For example, an application is not responding as it should because it's picking up a location that is then causing it to not function as it should. the application could be getting the wrong information or mistranslated it.  

Even if you turn location services off using the UI in windows. the user Interface allowed you to turn on or off location services however, that will be for the user that is logged in. So, with the local machine setting not changed, location services are still working.  Location services may be on in general for the operating system (the computer laptop or desktop). 

There are two registry location which are important for turning off location services. One is for the user that's logged in. This is a user level settings applied to the user. There is also a machine setting which will apply to the desktop or laptop in general. 

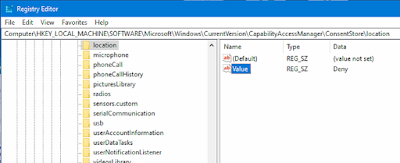
Set Deny in the following registry locations to disable or turn off Location services.

user settings

Computer\HKEY_CURRENT_USER\SOFTWARE\Microsoft\Windows\CurrentVersion\CapabilityAccessManager\ConsentStore\location


computer setting

Computer\HKEY_LOCAL_MACHINE\SOFTWARE\Microsoft\Windows\CurrentVersion\CapabilityAccessManager\ConsentStore\location


Thursday, June 16, 2022

Manually Sync Local Active Directory with Azure using CLI


Azure AD connect sync's shortest time to perform syncing operations is 30 minutes. Password changes in the domain are almost instant. They are at least synced nearly immediately but be aware there might be a lag once syncing is complete to Azure.  Also consider if your local active directory domain replication is slow during regular times, it seems infinitely slower when you are awaiting recent updates to user or group properties to sync and be present in Azure. 

Be sure all your domain controllers have synced with each other do the following. Connect to a Domain controller using RDP or another method like VMware console. Then once logged in , open an elevated command prompt. in the command prompt window enter the following command to sync ALL domain controllers immediately. 

                                           repadmin /syncall /APeD                       

Case sensitive is important for the command's options. lower and upper case mean different things with this command. I always use this command as it not only replicate with the same site but all sites, all domain controllers. this command and many others cane executed on a server and desktops if AD remote tools are installed. Servers and desktops can be accessed remotely using software for online desktop support or built-in desktop access tool such as RDP. 

PowerShell CLI to manually Sync Local Active Directory changes to Microsoft Azure 

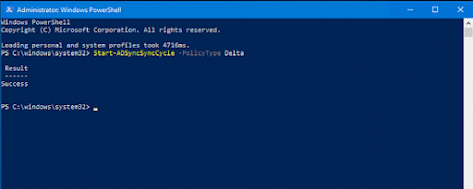
Once you are satisfied that your domain controller have replicated internally with each other then open a PowerShell prompt on the server that is running Azure AD connect service.  When the PowerShell command windows has opened, enter the following command (as shown in the screen shot). 

                                         Start-ADSyncSyncCycle -PolicyType -Delta

This will trigger a sync of local changes, additions, updates performed on local Active Directory objects.  When it completes you may still have to wait for the little lag time on the Azure side to see the results of the delta sync just performed.  I've been performing the two steps shown above for years and they always work. They also have saved time because it expedites the syncing process with absolutely no drawback. These steps have no negative impact. If you have a small environment with only several domain controllers and are confident there no local replication issues then you can just skip the step of replicating all the domain controllers. 

Share/Save/Bookmark


Tuesday, May 17, 2022

Disable Windows Server Auto Screen Lock on Windows Server


Disable Windows Server Auto Screen Lock on  Server 2012 2016/2019/2022


Disable Windows Server Auto Lock. 


Annoying while working on server issues to have the screen lock after only a few minutes. A necessary evil for security sake but just so dramatically annoying.  

Windows server screen lock could be disabled without a domain group policy. A domain policy would affect all servers and potentially desktops depending on how the OUs are structured and where each AD device is placed.   This an many other issues on the desktop can be resolved remotely using software that gives technical support access over the internet on-demand. Software for Online PC support allows connectivity to the desktop for screen-sharing support online. 

Windows server auto screen lock can be disabled by using only the local computer policy so this won't have to be applied to other servers or domain workstations. 

Start by running the local group policy console. You get that by clicking  search or the taskbar Windows icon usually on the bottom left of the desktop screen, then begin typing the word Group and select Edit Group Policy  (local policy). That will start the right local not domain policy console. 


Disable Windows Server  Screen Lock - Auto-Lock 

Now you'll be editing the local group policy - NOT the domain group policy 


When the console loads navigate to   System | Power Management | Video and Display Settings | double click on Turn off the display (plugged in) setting


Enable it, set to 0. 


This is option and so is a reboot , neither is required to complete

Open a command prompt (elevated), run/execute the command: 

                   gpupdate /force 


This has worked for me many times and has saved me a ton of time needlessly re-logging into a server desktop. Could work on Windows 10 and Windows 11. Haven't tested, if you've tried it on Windows 10 or 11 or have a method for the same , post what you do to disable the auto-lock screen lock screen. 


Share/Save/Bookmark


Access desktops, Servers, Network switches and even firewalls online remotely.  


Tuesday, May 10, 2022

Two little Blue Arrows on Files and Folders.

Computer Support - Rated E for Everyone: The world of supporting tech-nol-o-gy.

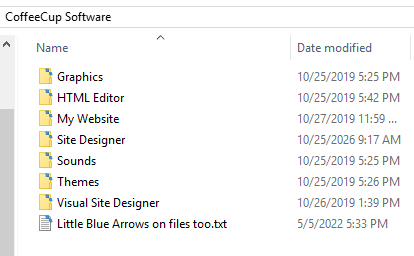
Surprised by a change in folder and file icon appearance. 

Blue Arrows on File and Folder Icons - Windows 10 , Windows 11 

Blue Arrows on File and Folder Icons - Windows 10


Firstly, folders and files can change appearance for many reasons and most of the changes will be because of a software application that was installed on the desktop. Most often it's cloud storage like Azure or Dropbox or even backup software.  Well, what if you didn't install anything and suddenly you login to your desktop and find the folders look different. They have two little blue arrows on them or overlaying  (a technical way of describing this unexpected and most cased unwanted phenomenon).  This desktop issue and others like it can be addressed remotely using software for remote access. Locally installed or web based online software with screen-sharing and remote control. You or a technical support person can access the desktop quickly and review compression settings. 

Simple explanation to a surprise change in folder and file appearance on Windows 10, Windows 11 and future releases of Microsoft Windows is compression.  When your hard-drive runs low on space, windows will automatically compress folders and files to reduce the space used and of course to create more to operate. This is an automatic process that Windows does when a certain threshold of free disk space has passed. 
The automatic compression is a good thing actually, image the surprise if your computer stops working any any usable speed or stops working all together because it has not drive space. That used to occur but with this automatic feature, you get little blue icons on folders and files instead. 

It's best at this point to find and either move or delete folders and files you don't need to free up space because compression will work only for so long to keep the system running. 


Share/Save/Bookmark


.

Tuesday, April 26, 2022

Liquidware Profile Unity - vhd Compacting

Liquidware Profile Unity - vhd Compacting

names were blocked out of the image - they are not needed. Image is an example of the output. 


Both .vhd and .vhdx  are Microsoft virtual hardrive file extensions. 

Liquidware compact tool works wonders on user .vhdx profile disk files. 

In the example above we can see that the tool run a defrag on the disk. Then proceeds to compact the disk by removing white space. Whitespace will vary by user. Whitespace is space that was used by files  and then the files were deleted. The files took up space causing the virtual disk to expand but when removed, the disk remained expanded. Thin provisioned disks will do this, it is normal behavior. What the compact tool does is shrink the disk back down by removing the whitespace created by file deletions.   

Virtual Disk WhiteSpace

A virtual disk will be thin provisioned and start very small, maybe several megs to a couple of hundred. this occurs not only with Microsoft's virtual disk format of vhd and vhdx but also with virtual disks, .vmdk files,  created for vmware virtual machines. 

Sample Compacting Tool command line

the command line used for the compacting tool output shown in the screen cap is shown below. There is a configuration file that can be updated to change the location such as where the backup file is placed and the working directory. In the example, those options were provided during run time, when the command was run. 

LwL.ProfileUnity.Client.CompactVHD.exe /VHDFile \\servername\Profiles\username\ProfileDisk\username_ProfileDisk.vhdx  /WorkDir e:\CompactWorkDir\ /AcceptEULA
 
Share/Save/Bookmark

Backup to Cloud using Veeam 

File and Folder Compression