Monday, April 01, 2024

Unexpected Reboot C:\Windows\system32\SystemSettingsAdminFlows.exe has initiated the power off

The Process C:\Windows\system32\SystemSettingsAdminFlows.exe has initiated the power off   


Unexplained Sudden RDS server reboots. 


RDS Server  process C:\Windows\system32\SystemSettingsAdminFlows.exe has initiated the power off


Unexplained RDS server reboots. 


In the system log the following entry exists, process C:\Windows\system32\SystemSettingsAdminFlows.exe has initiated the power off. 

SystemSettingsAdminFlows.exe is an operating system component and a valid window executable. The error logged gives all the information, even though it is initially unclear. It's likely that you have also combed through logs and questioned whether service is the reason behind the restarts, as many forum members have done. It also makes sense to verify scheduled tasks and determine whether updates are the reason for the restarts. 

A user who may or may not have administrator access to the local server could also cause this event, especially on an RDS server, and cause the restart. 

Simply using the regular technique for system shutdown will shut down the server for new users or users who are not familiar with the disconnect process. In these kinds of situations, the server logs will contain the following entry: "process C:\Windows\system32\SystemSettingsAdminFlows.exe has initiated the power off". 


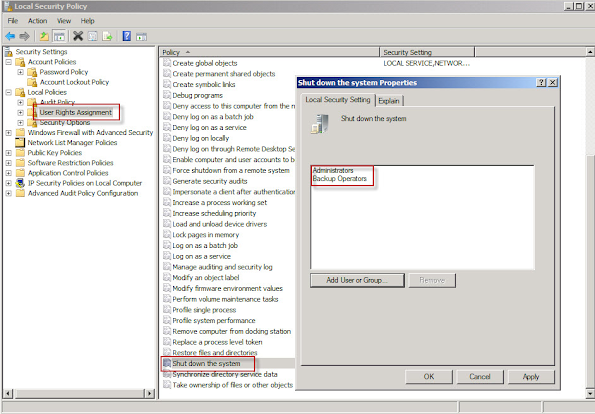
Removing or hiding the option from the Windows Start button is one way to resolve the problem and stop users from inadvertently shutting down the RDS server. Using the server's local security policy is the simplest and fastest way. Add to a GPO if there are numerous servers in your environment. 


Hiding the user options “Shut down” and “Restart” in the Start Menu:

  • Open the Local Group Policy Editor: Start -> Run -> Enter gpedit.msc
  • Move to User  Configuration/ Administrative Templates/ Start Menu and Taskbar
  • Enable “Remove and Prevent access to the Shut Down from Start Menu”
Hiding the entries “Shut down” and “Restart” in the Start Menu


Please share. 


Share/Save/Bookmark

Wednesday, January 31, 2024

Share and Maintain RDP Connections Without a File Server


Users Access RDP Connections with No Shares, No shortcuts.


Microsoft first introduced remote desktop protocol in Windows Terminal Server. Then added to desktop operating systems.  

Managing RDP connections efficiently is crucial for businesses that rely on remote access to maintain their workflows and achieving this without the traditional dependency on network shares, file servers or even shortcut proliferation is becoming increasingly practical. A centralized RDP management system provides a streamlined solution, enabling teams to access remote desktops without the need for creating and managing individual shortcuts or shares. This central access hub allows users to connect to various remote systems through an online platform, negating the need for local network configurations.


This method of sharing RDP connections simplifies the entire process, as administrators can assign and manage permissions within a single interface. With no shares needed, the security risks associated with multiple access points are significantly reduced. Users benefit from a consistent experience, as they can access their required systems from any location with an internet connection, all the while without cluttering their desktops with an excess of shortcuts.


Centralizing RDP connections not only aids in managing them more effectively but also promotes a higher level of collaboration among team members. Central access means that updates to connection details are immediately effective for all users, ensuring everyone is on the same page and reducing downtime due to outdated information. The absence of dependence on a file server for RDP shortcuts or connection files also reduces the network traffic and infrastructure required for remote desktop management.


Furthermore, a shared online RDP management system offers the advantage of being accessible across various devices. Team members can manage and initiate RDP sessions from laptops, tablets, or smartphones, adding a level of convenience and mobility to their work. This adaptability is particularly beneficial for organizations with a flexible or remote workforce.


By employing a centralized RDP management system with no shares or shortcuts involved, companies can maintain tighter control over their remote desktop protocols. It streamlines the process of managing RDP access while also focusing on the security, efficiency, and convenience that modern businesses demand, enabling a robust and seamless remote access environment.


Monday, September 04, 2023

How to Change the RDP Port on Windows 11


Why or when to change RDP port number

A decision to change the Remote Desktop Protocol (RDP) port number should be based on a careful evaluation of the potential risks and benefits. Changing the RDP port number can enhance security by adding an extra layer of protection against automated scanning tools that often target default port 3389. This can effectively reduce the likelihood of unauthorized access attempts and brute-force attacks. Additionally, changing the RDP port number allows organizations to maintain a low profile in terms of network fingerprinting, making it more difficult for attackers to identify vulnerable systems. However, this decision must be weighed against potential drawbacks such as increased administrative complexity, compatibility issues with certain applications or firewalls, and the need for extensive configuration adjustments across all affected devices. Ultimately, before changing the RDP port number, it is important to thoroughly assess the specific security needs and infrastructure of one's organization, seeking expert advice if necessary.

How to Change the RDP Port Number in Windows 11


Open the Registry Editor open the Start menu and type "regedit." In the results that appear click "Registry Editor" icon to open. 

The key we need to navigate to is "HKEY_LOCAL_MACHINE\SYSTEM\CurrentControlSet\Control\Terminal Server\WinStations\RDP-Tcp". This key contains the settings for the Remote Desktop Protocol (RDP) connection.


Once you have reached this key, locate the value named "PortNumber" on the right-hand side of the Registry Editor window. This value represents the current port number used for RDP connections.

KEY_LOCAL_MACHINE\System\CurrentControlSet\Control\Terminal Server\WinStations\RDP-Tcp


To change the port number, double-click on "PortNumber" and a small dialog box will appear. In this dialog box, select the "Decimal" option if it is not already selected. Now, you can enter a new port number that you wish to use for RDP connections. 


Locate the "RCP-Tcp" key,  in the right half of the window and select "PortNumber" and double-click. 


After entering the desired port number, click on the "OK" button to save the changes. This will set the new port number for Remote Desktop Protocol (RDP) on your system.


It's important to note that when choosing a new port number, you should avoid commonly used ports to prevent conflicts with other services. The default RDP port is 3389, so selecting a different number like 1337 can help enhance security by making it less predictable for potential attackers.

Once you have changed the RDP port number, you may need to configure your network settings accordingly. If you are behind a router or firewall, you will need to forward the new port to your computer's IP address. This ensures that incoming RDP connections are properly directed to your machine.

Additionally, if you have any security software or firewalls enabled on your computer, make sure to update their settings to allow incoming connections on the newly assigned RDP port.

The setting change takes effect immediately. There isn't a save menu option in registry editor. 


How does RDP protocol and client access servers and desktops. 

A little more about RDP. The Remote Desktop Protocol (RDP) is a proprietary protocol that allows users to remotely access servers and desktops. It establishes a secure connection between the client device and the remote computer, enabling the user to interact with the remote system as if they were physically present. The RDP client, typically built into Windows operating systems, enables users to initiate a connection by entering the IP address or hostname of the server or desktop they wish to access. Upon successful authentication, RDP transfers display and input data over this connection, allowing users to view and control the remote system's desktop in real-time. RDP efficiently compresses and encrypts transmitted data, ensuring confidentiality and minimizing lag. Additionally, advanced features like file transfer and printer redirection further enhance its functionality. Overall, RDP serves as an indispensable tool for professionals needing convenient remote access to servers and desktops while maintaining security and performance standards.


Tuesday, August 15, 2023

Best Software Tool RDP Management


1. Introduction to Online RDP Manager


As remote work becomes increasingly prevalent, efficiently managing and centralizing Remote Desktop Protocol (RDP) connections has become crucial for organizations. Online RDP Manager, a powerful software tool, offers a comprehensive solution for streamlining RDP connection management. This article explores the software features, benefits, and step-by-step setup guide for Online RDP Manager. Additionally, it delves into how this tool enhances security, access control, troubleshooting, and best practices, providing a comprehensive overview for both beginners and experienced users. Discover how Online RDP Manager can revolutionize the way you manage and centralize RDP connections, leading to improved productivity, enhanced security, and streamlined remote access.


1. Introduction to Online RDP Manager


1.1 What is Online RDP Manager?


Online RDP Manager is a game-changing software tool designed to simplify the management and centralization of Remote Desktop Protocol (RDP) connections. With this handy tool in your arsenal, you can bid farewell to the headache of manually juggling multiple RDP connections. Centralize, organize all RDP connections into a single location for quick repeated access of servers and desktops.   It's like having a personal assistant for all your remote access needs!

1.2 The need for Centralized RDP Connection Management


In today's fast-paced world where remote work is becoming increasingly common, having a centralized solution for managing RDP connections is more crucial than ever. Without a proper system in place, the process of connecting to different servers and devices remotely can quickly become a chaotic mess. This is where Online RDP Manager swoops in to save the day, offering a streamlined and efficient approach to RDP connection management.


2. Benefits of using Online RDP Manager


2.1 Streamlined RDP Connection Management


With Online RDP Manager, you can say goodbye to the days of frantically searching through your email or scribbled notes to find the right login credentials for each RDP connection. Numerous remote desktop manager software tools provide a centralized repository where you can store and organize all your RDP connections, allowing for easy access and management with just a few clicks.  To maintain the security of your RDP connections while still centralizing and providing management of the connections, 4RemoteSupport RDPMan™ doesn't store user credentials.  

2.2 Improved Efficiency and Productivity


By eliminating the hassle of manually configuring and remembering RDP connection details, Online RDP Manager helps boost your productivity. With a user-friendly interface and intuitive features, you can quickly connect to your desired servers and devices, saving valuable time and effort. No more fumbling around with complex settings or wasting hours on tedious setup tasks!

2.3 Enhanced Security and Access Control


Online RDP Manager takes security seriously. It allows you to set up customized access permissions, ensuring that only authorized individuals can access specific RDP connections. This significantly reduces the risk of unauthorized access and potential security breaches. Plus, with automated credential management, you can rest easy knowing your login details are securely stored and encrypted.  This is most commonly accomplished by the RDP client such as Microsoft's mstsc.exe executable. Mstsc.exe client executable is the default Windows desktop and server RDP client. 


3. Key Features and Functionality of Online RDP Manager


3.1 User-friendly Interface


Online RDP Manager boasts an intuitive and user-friendly interface. 4RemoteSupport RDPMan™ makes it a breeze to navigate and operate. Even if you're not the most tech-savvy individual, you'll find yourself effortlessly managing your RDP connections like a pro in no time.

3.2 Centralized RDP Connection Repository


Gone are the days of scattered RDP connection details. Online RDP Manager provides a centralized repository where you can neatly organize and store all your connections. From servers to devices, you can easily add, edit, and remove connections, ensuring everything is conveniently accessible in one place.

3.3 Customized Access Permissions


With Online RDP Manager, you have full control over access permissions. You can assign different levels of access to specific RDP connections based on user roles or groups. This means that only authorized individuals can connect to sensitive servers, preventing any unauthorized access and potential security breaches.

3.4 Automated Credential Management


Say goodbye to the tedious task of manually inputting login credentials for each RDP connection. Online RDP Manager automates credential management, securely storing and encrypting your login details. This not only saves you time but also ensures the security of your sensitive information.


4. Step-by-step Guide to Setting up Online RDP Manager


4.1 System Requirements


Before diving into the setup process, it's important to ensure your system meets the necessary requirements for Online RDP Manager. Check the official documentation or website for the specific system requirements, including supported operating systems and hardware specifications.

4.2 Installation and Configuration


Once you've confirmed your system meets the requirements, it's time to install Online RDP Manager. Simply follow the installation wizard, which typically involves selecting the installation location and agreeing to the terms and conditions. After the installation is complete, you can proceed with the initial configuration, such as setting up a master password and choosing storage options.

4.3 Adding and Managing RDP Connections


With Online RDP Manager up and running, it's time to start adding and managing your RDP connections. Depending on the tool's interface, you may need to navigate to the "Add Connection" or similar option. Enter the necessary details, such as the server's IP address, port, username, and password. Once added, you can easily connect to any RDP session within a few clicks, and manage your connections from the centralized repository.


In summary, Online RDP Manager is a lifesaver for anyone dealing with multiple RDP connections. Its streamlined and user-friendly approach not only saves time and boosts productivity but also enhances security and access control. With this valuable tool in your toolkit, managing and centralizing your RDP connections has never been easier. So, say goodbye to the hassle and embrace the convenience of 4RemoteSupport RDPMan™ Online RDP Manager!

5. Managing and Centralizing RDP Connections with Online RDP Manager


Managing and centralizing Remote Desktop Protocol (RDP) connections can be a cumbersome task, especially when dealing with multiple servers and devices. Thankfully, Online RDP Manager comes to the rescue, offering a user-friendly software tool that simplifies this process.

5.1 Organizing RDP Connections into Groups


Tired of scrolling through an endless list of RDP connections? With Online RDP Manager, you can kiss that frustration goodbye. This handy tool allows you to organize your RDP connections into groups, making it easier than ever to locate and access the server you need. Whether you're dealing with different departments, clients, or projects, grouping your connections provides a neat and efficient way to stay organized.

5.2 Searching and Filtering RDP Connections


Lost in a sea of RDP connections? Say no more! Online RDP Manager includes powerful search and filtering capabilities that let you quickly find the connection you're looking for. Simply type in a keyword, use filters based on IP addresses or custom attributes, and voila! Your desired RDP connection will be at your fingertips. No more wasting time and getting frustrated over misplaced connections.

5.3 Remote Access and Control


Once you've found the right RDP connection, Online RDP Manager takes it a step further by providing seamless remote access and control. Effortlessly connect to any server or device with just a few clicks, and take control as if you were physically present. Whether you need to troubleshoot, configure, or perform any other tasks remotely, this software tool has got you covered.

6. Enhancing Security and Access Control using Online RDP Manager


When it comes to managing RDP connections, security should always be a top priority. Online RDP Manager understands this and offers a range of features to enhance security and access control.

6.1 Implementing Multi-factor Authentication


Passwords alone aren't always enough to keep your RDP connections secure. With Online RDP Manager, you can implement multi-factor authentication, adding an extra layer of protection. This means you'll need both a password and a secondary verification method, such as a fingerprint or a one-time password, to access your connections. Keep those online miscreants at bay!

6.2 Auditing and Logging Capabilities


Curious about who accessed a particular RDP connection and when? Online RDP Manager has got your back with its auditing and logging capabilities. Keep track of user activities, login attempts, and any changes made to your RDP connections. If something fishy happens, you'll have a trail to follow and nail down the culprit.

6.3 Role-based Access Control


Sometimes, not everyone needs access to every RDP connection. Online RDP Manager lets you implement role-based access control, ensuring that only authorized individuals can access specific connections. Assign different roles with varying levels of privileges, keeping your connections secure and limiting potential risks.

7. Troubleshooting and Best Practices for Online RDP Manager


While Online RDP Manager is intuitive and easy to use, it's always helpful to have some troubleshooting tips and best practices up your sleeve.

7.1 Common Issues and their Solutions


Encountering a roadblock? Fear not! Check out the common issues and their solutions section to troubleshoot any problems you may face. From connection errors to compatibility issues, we've got you covered with practical solutions and workarounds.

7.2 Backup and Recovery Strategies


Nobody wants to lose their precious RDP connections. That's why it's crucial to have proper backup and recovery strategies in place. Learn how to safeguard your connections and quickly recover them in case of any mishaps. Rest easy knowing your connections are secure and easily restorable.

7.3 Best Practices for Optimizing Performance


Wishing for a lightning-fast and smooth RDP experience? Discover the best practices for optimizing performance with Online RDP Manager. From network settings to server configurations, these tips and tricks will help you make the most out of your RDP connections and enjoy a seamless remote experience.

8. Conclusion and Future Outlook for Online RDP Manager


In conclusion, Online RDP Manager is a game-changer when it comes to managing and centralizing RDP connections. With its convenient features for organizing, searching, and accessing connections, along with enhanced security measures, it's a must-have tool for any IT professional or remote worker.

As technology continues to advance, we can only expect Online RDP Manager to evolve and bring even more innovative features to the table. So, embrace the power of centralized RDP management and simplify your remote access experience like never before!

8. Conclusion and Future Outlook for Online RDP Manager


In conclusion, Online RDP Manager Software offers a robust solution for managing and centralizing RDP connections. By providing a user-friendly interface, customized access permissions, and automated credential management, it streamlines the process and enhances efficiency. With features like multi-factor authentication, auditing capabilities, and role-based access control, it also prioritizes security and access control. By following the step-by-step setup guide and implementing best practices, users can optimize their experience with Online RDP Manager. As remote work continues to evolve, this tool holds great promise in revolutionizing the way organizations manage their RDP connections. Embrace Online RDP Manager and embark on a journey towards improved productivity, enhanced security, and streamlined remote access.


FAQ


1. Can I use Online RDP Manager with any RDP client?


Yes, Online RDP Manager is compatible with most RDP clients available in the market. It seamlessly integrates with popular clients like Microsoft Remote Desktop, Chrome Remote Desktop, and more. You can easily connect to your RDP sessions using your preferred client while leveraging the centralized management capabilities of Online RDP Manager.


2. Is it possible to migrate existing RDP connections to Online RDP Manager?


Absolutely! Online RDP Manager provides an easy-to-use import feature that allows you to migrate your existing RDP connections effortlessly. Simply follow the instructions in the tool to import your connections, and they will be centralized and ready for management within Online RDP Manager.


3. Can multiple users access and manage RDP connections simultaneously with Online RDP Manager?


Yes, Online RDP Manager supports multi-user access, enabling multiple users to simultaneously access and manage RDP connections. With the role-based access control feature, administrators can assign specific permissions to each user, ensuring secure and controlled access to the RDP connections based on their roles and responsibilities.


4. Is Online RDP Manager a cloud-based solution?


Online RDP Manager can be deployed either on-premises or in the cloud, depending on your organization's preference and requirements. It offers flexibility in terms of deployment options, allowing you to choose the setup that best aligns with your infrastructure and security policies.


Simple RDP Connections Manager Live Demo. 

Friday, October 28, 2022

Citrix CVAD Delivery Controller Show the SQL Database Server

 Use PowerShell CLI to show Citrix Broker database server name. 


PS C:\> Add-PSSnapin Citrix*

PS C:\> Get-ConfigDBConnection

Your output will show the database server name. If it's a cluster SQL server environement, you will see the cluster name. 


 An additional powershell command to display all commands related to the DB connection is 

 PS C:\> Get-Command Get-*DBConnection | Get-Unique | Select Nam

The result of the command is a list of useful CLI powershell commands:

Name

----

Get-AcctDBConnection
Get-AdminDBConnection
Get-AnalyticsDBConnection
Get-AppLibDBConnection
Get-BrokerDBConnection
Get-ConfigDBConnection
Get-EnvTestDBConnection
Get-HypDBConnection
Get-LogDBConnection
Get-MonitorDBConnection
Get-OrchDBConnection
Get-ProvDBConnection
Get-SfDBConnection
Get-TrustDBConnection


Monday, October 24, 2022

Turn off Location Services -Windows 10 how To

Turn on or Turn off Location Services


Use the registry Turn on or Turn off Location Services

You may want to turn off location services ion your desktop for whatever reason. For example, an application is not responding as it should because it's picking up a location that is then causing it to not function as it should. the application could be getting the wrong information or mistranslated it.  

Even if you turn location services off using the UI in windows. the user Interface allowed you to turn on or off location services however, that will be for the user that is logged in. So, with the local machine setting not changed, location services are still working.  Location services may be on in general for the operating system (the computer laptop or desktop). 

There are two registry location which are important for turning off location services. One is for the user that's logged in. This is a user level settings applied to the user. There is also a machine setting which will apply to the desktop or laptop in general. 

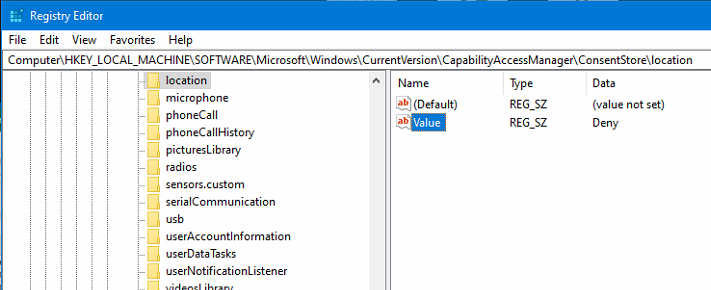
Set Deny in the following registry locations to disable or turn off Location services.

user settings

Computer\HKEY_CURRENT_USER\SOFTWARE\Microsoft\Windows\CurrentVersion\CapabilityAccessManager\ConsentStore\location


computer setting

Computer\HKEY_LOCAL_MACHINE\SOFTWARE\Microsoft\Windows\CurrentVersion\CapabilityAccessManager\ConsentStore\location


Thursday, June 16, 2022

Manually Sync Local Active Directory with Azure using CLI


Azure AD connect sync's shortest time to perform syncing operations is 30 minutes. Password changes in the domain are almost instant. They are at least synced nearly immediately but be aware there might be a lag once syncing is complete to Azure.  Also consider if your local active directory domain replication is slow during regular times, it seems infinitely slower when you are awaiting recent updates to user or group properties to sync and be present in Azure. 

Be sure all your domain controllers have synced with each other do the following. Connect to a Domain controller using RDP or another method like VMware console. Then once logged in , open an elevated command prompt. in the command prompt window enter the following command to sync ALL domain controllers immediately. 

                                           repadmin /syncall /APeD                       

Case sensitive is important for the command's options. lower and upper case mean different things with this command. I always use this command as it not only replicate with the same site but all sites, all domain controllers. this command and many others cane executed on a server and desktops if AD remote tools are installed. Servers and desktops can be accessed remotely using software for online desktop support or built-in desktop access tool such as RDP. 

PowerShell CLI to manually Sync Local Active Directory changes to Microsoft Azure 

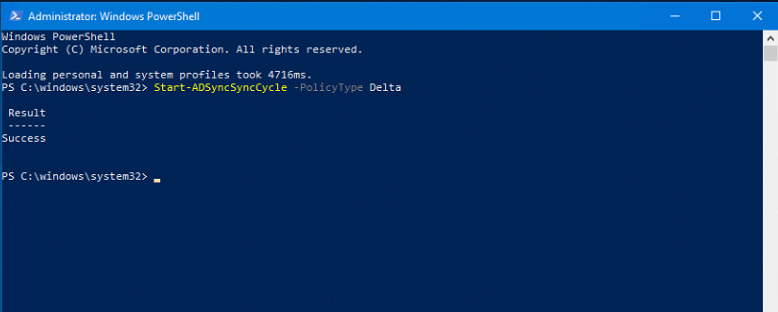
Once you are satisfied that your domain controller have replicated internally with each other then open a PowerShell prompt on the server that is running Azure AD connect service.  When the PowerShell command windows has opened, enter the following command (as shown in the screen shot). 

                                         Start-ADSyncSyncCycle -PolicyType -Delta

This will trigger a sync of local changes, additions, updates performed on local Active Directory objects.  When it completes you may still have to wait for the little lag time on the Azure side to see the results of the delta sync just performed.  I've been performing the two steps shown above for years and they always work. They also have saved time because it expedites the syncing process with absolutely no drawback. These steps have no negative impact. If you have a small environment with only several domain controllers and are confident there no local replication issues then you can just skip the step of replicating all the domain controllers. 

Share/Save/Bookmark


Tuesday, May 17, 2022

Disable Windows Server Auto Screen Lock on Windows Server


Disable Windows Server Auto Screen Lock on  Server 2012 2016/2019/2022


Disable Windows Server Auto Lock. 


Annoying while working on server issues to have the screen lock after only a few minutes. A necessary evil for security sake but just so dramatically annoying.  

Windows server screen lock could be disabled without a domain group policy. A domain policy would affect all servers and potentially desktops depending on how the OUs are structured and where each AD device is placed.   This an many other issues on the desktop can be resolved remotely using software that gives technical support access over the internet on-demand. Software for Online PC support allows connectivity to the desktop for screen-sharing support online. 

Windows server auto screen lock can be disabled by using only the local computer policy so this won't have to be applied to other servers or domain workstations. 

Start by running the local group policy console. You get that by clicking  search or the taskbar Windows icon usually on the bottom left of the desktop screen, then begin typing the word Group and select Edit Group Policy  (local policy). That will start the right local not domain policy console. 


Disable Windows Server  Screen Lock - Auto-Lock 

Now you'll be editing the local group policy - NOT the domain group policy 


When the console loads navigate to   System | Power Management | Video and Display Settings | double click on Turn off the display (plugged in) setting


Enable it, set to 0. 


This is option and so is a reboot , neither is required to complete

Open a command prompt (elevated), run/execute the command: 

                   gpupdate /force 


This has worked for me many times and has saved me a ton of time needlessly re-logging into a server desktop. Could work on Windows 10 and Windows 11. Haven't tested, if you've tried it on Windows 10 or 11 or have a method for the same , post what you do to disable the auto-lock screen lock screen. 


Share/Save/Bookmark


Access desktops, Servers, Network switches and even firewalls online remotely.  


Tuesday, May 10, 2022

Two little Blue Arrows on Files and Folders.

Computer Support - Rated E for Everyone: The world of supporting tech-nol-o-gy.

Surprised by a change in folder and file icon appearance. 

Blue Arrows on File and Folder Icons - Windows 10 , Windows 11 

Blue Arrows on File and Folder Icons - Windows 10


Firstly, folders and files can change appearance for many reasons and most of the changes will be because of a software application that was installed on the desktop. Most often it's cloud storage like Azure or Dropbox or even backup software.  Well, what if you didn't install anything and suddenly you login to your desktop and find the folders look different. They have two little blue arrows on them or overlaying  (a technical way of describing this unexpected and most cased unwanted phenomenon).  This desktop issue and others like it can be addressed remotely using software for remote access. Locally installed or web based online software with screen-sharing and remote control. You or a technical support person can access the desktop quickly and review compression settings. 

Simple explanation to a surprise change in folder and file appearance on Windows 10, Windows 11 and future releases of Microsoft Windows is compression.  When your hard-drive runs low on space, windows will automatically compress folders and files to reduce the space used and of course to create more to operate. This is an automatic process that Windows does when a certain threshold of free disk space has passed. 
The automatic compression is a good thing actually, image the surprise if your computer stops working any any usable speed or stops working all together because it has not drive space. That used to occur but with this automatic feature, you get little blue icons on folders and files instead. 

It's best at this point to find and either move or delete folders and files you don't need to free up space because compression will work only for so long to keep the system running. 


Share/Save/Bookmark


.

Tuesday, April 26, 2022

Liquidware Profile Unity - vhd Compacting

Liquidware Profile Unity - vhd Compacting

names were blocked out of the image - they are not needed. Image is an example of the output. 


Both .vhd and .vhdx  are Microsoft virtual hardrive file extensions. 

Liquidware compact tool works wonders on user .vhdx profile disk files. 

In the example above we can see that the tool run a defrag on the disk. Then proceeds to compact the disk by removing white space. Whitespace will vary by user. Whitespace is space that was used by files  and then the files were deleted. The files took up space causing the virtual disk to expand but when removed, the disk remained expanded. Thin provisioned disks will do this, it is normal behavior. What the compact tool does is shrink the disk back down by removing the whitespace created by file deletions.   

Virtual Disk WhiteSpace

A virtual disk will be thin provisioned and start very small, maybe several megs to a couple of hundred. this occurs not only with Microsoft's virtual disk format of vhd and vhdx but also with virtual disks, .vmdk files,  created for vmware virtual machines. 

Sample Compacting Tool command line

the command line used for the compacting tool output shown in the screen cap is shown below. There is a configuration file that can be updated to change the location such as where the backup file is placed and the working directory. In the example, those options were provided during run time, when the command was run. 

LwL.ProfileUnity.Client.CompactVHD.exe /VHDFile \\servername\Profiles\username\ProfileDisk\username_ProfileDisk.vhdx  /WorkDir e:\CompactWorkDir\ /AcceptEULA
 
Share/Save/Bookmark

Backup to Cloud using Veeam 

File and Folder Compression